Setting up a Time Stamping Authority with OpenSSL
November 12, 2018
Introduction
I recently had to get down and dirty with OpenSSL, the ubiquitous cryptographic SSL/TLS toolkit, developed by the folks at openssl.com. The latest released version (v1.1.1, Sept. 11, 2018) has an enhanced suite of sub-commands (req, ocsp, x509, etc.), an expanded list of message digest algorithms (blake2b512, shake256, etc.) and a much larger list of supported ciphers than previous versions.
While dirty, I discovered that there is a dearth of reliable, current information on the OpenSSL time stamp command ‘ts’. This article attempts to help anyone else seeking information on how to implement a robust Time Stamping Authority with OpenSSL.
The efforts here greatly rely on the work of Ivan Ristic, the author of “Bulletproof SSL and TLS” (2015, Feisty Duck Publishing, London). In particular, the sections on creating a private Certificate Authority are helpful for the illustrative configuration file examples that are used throughout. These efforts are also online at (https://www.feistyduck.com/library/openssl%2dcookbook/online/ch-openssl.html#openssl-private-ca).
What follows is a summary of the step by step instructions to create a private CA with self-signed certificates using the following configuration. See the above blog post for details. Note that the order of operations below is slightly different from the on-line version. We do not create a Sub CA, CRL, or OCSP but we do create a TSA certificate.
Use the configuration file below along with the details in the on-line tutorial to get started. If you already have a certificate authority set up, you can just create the configuration file and skip to the section below on Setting Up a Time Stamping Authority.
Initial configuration
Copy the text below into ~/tmp/rootca.conf
#
# rootca.conf
#
# See Ristic OpenSSL Cookbook URL above.

######  First Part ########

[default]
name                    = root-ca
domain_suffix           = example.com
aia_url                 = http://$name.$domain_suffix/$name.crt
crl_url                 = http://$name.$domain_suffix/$name.crl
ocsp_url                = http://ocsp.$name.$domain_suffix:9080
default_ca              = ca_default
name_opt                = utf8,esc_ctrl,multiline,lname,align

[ca_dn]
countryName             = "US"
organizationName        = "Example Inc."
commonName              = "Root CA"

###### Second Part #######

[ca_default]
home                    = .
database                = $home/db/index
serial                  = $home/db/serial
crlnumber               = $home/db/crlnumber
certificate             = $home/$name.crt
private_key             = $home/private/$name.key
RANDFILE                = $home/private/random
new_certs_dir           = $home/certs
unique_subject          = no
copy_extensions         = none
default_days            = 3650
default_crl_days        = 30
default_md              = sha256
policy                  = policy_c_o_match
name                    = foo@example.com


[policy_c_o_match]
countryName             = match
stateOrProvinceName     = optional
organizationName        = match
organizationalUnitName  = optional
commonName              = supplied
emailAddress            = optional


##### Third Part #######

[req]
default_bits            = 4096
encrypt_key             = yes
default_md              = sha256
utf8                    = yes
string_mask             = utf8only
prompt                  = no
distinguished_name      = ca_dn
req_extensions          = ca_ext


[ca_ext]
basicConstraints        = critical,CA:true
keyUsage                = critical,keyCertSign,cRLSign
subjectKeyIdentifier    = hash


####### Fourth Part - Extensions  ########
#
# Value           Meaning  - see x509v3.cnf(5)
# --------        ------------------------------
# serverAuth      SSL/TLS web server authentication
# clientAuth      SSL/TLS web client authentication
# codeSigning     code signing
# emailProtection email protection (S/MIME)
# timeStamping    trusted doc hash timestamping
# OCSPSigning     OCSP Signing
# ipsecIKE        IPsec internet key exchange
# msCodeInd       Microsoft individual code signing (authenticode)
# msCodeCom       Microsoft commercial code signing (authenticode)
# msCTLSign       Microsoft trust list signing
# msEFS           Microsoft encrypted file system (EFS)


[sub_ca_ext]
authorityInfoAccess     = @issuer_info
authorityKeyIdentifier  = keyid:always
basicConstraints        = critical,CA:true,pathlen:0
crlDistributionPoints   = @crl_info
keyUsage                = critical,keyCertSign,cRLSign
extendedKeyUsage        = clientAuth,serverAuth
nameConstraints         = @name_constraints
subjectKeyIdentifier    = hash


[crl_info]
URI.0                   = $crl_url

[issuer_info]
caIssuers;URI.0         = $aia_url
OCSP;URI.0              = $ocsp_url

[name_constraints]
permitted;DNS.0=example.com
permitted;DNS.1=example.org
excluded;IP.0=0.0.0.0/0.0.0.0
excluded;IP.1=0:0:0:0:0:0:0:0/0:0:0:0:0:0:0:0


#######  Fifth Part  ==========


[ocsp_ext]
authorityKeyIdentifier  = keyid:always
basicConstraints        = critical,CA:false
extendedKeyUsage        = OCSPSigning
keyUsage                = critical,digitalSignature
subjectKeyIdentifier    = hash
Private CA Setup
First, we need a private ceritificate authority. Our setup looks like this:
$ mkdir -p ~/tmp/ca
$ cd ~/tmp/ca
$ mkdir certs db private
$ chmod 700 private
$ touch db/index
$ openssl rand -hex 16 > db/serial
$ echo ‘1001’ >  db/crlnumber
$ echo ‘01’ > tsa_serial
For these examples, I put the above configuration file in ~/tmp instead of putting it in ~/tmp/ca. The first set of steps creates a root CA.
Change directory to ~/tmp/ca and create a new private key and root CA certificate request in one step:
$ openssl req -new -newkey rsa:2048 -config ../rootca.conf -out root-ca.csr -keyout private/root-ca.key
Don’t forget the password – you’ll need it again and again below.
Now self-sign the certificate request.
$ openssl ca -selfsign -config ../rootca.conf -in root-ca.csr -out root-ca.crt -extensions ca_ext
Enter password, sign and commit with ‘y’.
Check the certificate:
$ openssl x509 -text -in root-ca.crt -noout
The tutorial proceeds to generate a Sub CA, a Certificate Revocation List, and an Online Certificate Status Protocol responder, but we skip those here since we don’t use them.
Setting Up a Time Stamping Authority
We are now ready to create a Time Stamping Authority certificate. To begin, we need to make some tweaks to the rootca.conf configuration file:
At the top of the configuration file, BEFORE the first part ( [ default ] ) section, insert the following:
oid_section                     = new_oids

[ new_oids ]
tsa_policy1                     = 1.2.3.4.1
tsa_policy2                     = 1.2.3.4.5.6
tsa_policy3                     = 1.2.3.4.5.7

######  First Part ########

[default]
   . . .
These oids are used by the openssl ts sub-ommands.
Place the additional modifications below at the end of the rootca.conf configuration. I’ve included the complete, updated configuration file at the end of this article.
###########  TSA extension   ##############
#
# Copied from the OpenSSL CAtsa.cnf test configuration and modified for use as a TSA extension.
#
#

[ tsa ]

default_tsa             = tsa_config1

[ tsa_config1 ]
dir                     = .                     # TSA root directory, same as root-ca
serial                  = $dir/tsa_serial       # current serial number (mandatory)
signer_cert             = $dir/tsa.crt     # signing certificate (optional)
certs                   = $dir/tsa-chain.pem # certification chain (optional)
signer_key              = $dir/private/tsa.key # tsa private key (optional)
default_policy          = tsa_policy1
signer_digest           = sha256                # digest to use for signing (optional)
#other_policies         = tsa_policy2,tsa_policy3 # other policies (optional)
digests                 = sha256,sha384,sha512    # acceptable digests (mandatory)
accuracy                = secs:1,millisecs:500,microsecs:100 # accuracy optional
ordering                = yes                   # is ordering defined? (optional, default: no)
tsa_name                = yes                   # must tsa name be included in reply? (opt., default: no)
ess_cert_id_chain       = yes                   # must ess cert id change be incl? (opt., default: no)
ess_cert_id_alg         = sha256                # alg to compute cert. id (optional, default: sha1)

# The tsa_ext extension is
# used to create the tsa cert tsa.crt

[ tsa_ext ]

authorityKeyIdentifier  = keyid:always
basicConstraints        = critical,CA:false
extendedKeyUsage        = critical,timeStamping
keyUsage                = critical,nonRepudiation
subjectKeyIdentifier    = hash
To proceed, we first make a key and a certificate request for a non-CA certificate. We use the -subj option so we don’t have to use a configuration file for this step. The Country (C=US) and Organization (O=Example Inc.) elements must match the root certificate.
$ openssl req -new \
    -newkey rsa:2048 \
    -subj "/C=US/O=Example Inc./OU=Engineering/CN=Example Inc. TSA Responder" \
    -keyout private/tsa.key \
    -out tsa.csr
You should use a different password for the tsa.key private key.
Then we generate a non-CA certificate using the -extension tsa_ext command line option which points to the required extendedKeyUsage in the configuration file.
$ openssl ca -config ../rootca.conf -in tsa.csr -out tsa.crt -extensions tsa_ext -days 365
Sign with the root-ca.key private key password, and commit to the database.
Examine the new TSA certificate as follows:
$ openssl x509 -in tsa.crt -text -noout
Ensure that it has CA: false , keyUsage nonRepudiation, and extendedKeyUsage timeStamping.
Requests to the time stamp service usually require that the reply include the certificate chain of the service. We now create the certificate chain as follows:
First, extract just the PEM form of the x509 certificates for root-ca.crt and tsa.crt :
$ openssl x509 -in root-ca.crt -outform PEM -out root-ca.pem

$ openssl x509 -in tsa.crt -outform PEM -out tsa.pem
Next, concatenate the two bare certificates ensuring that the root certificate is last in the file:
$ cat tsa.pem root-ca.pem > tsa-chain.pem
You can verify this chain by just viewing the file:
$ cat tsa-chain.pem
Generating a TimeStamp Request
Ok! We are now ready to create a time stamp request. First, we prepare a query:
$ openssl ts -query -config ../rootca.conf -data /etc/hosts -out request.tsq
View the request with
$ openssl ts -query -in request.tsq -text
Note that since we did not request certificate checking (using the -cert option in the request command above), the text output of this command shows “Certificate required: no”. Also, note that we did not specify our own configuration file in the above example.
Now, note the “Hash Algorithm: sha1” line in the output. Shouldn’t that be sha256, since that is what we requested in the configuration file? It turns out that the openssl ts -query command only uses the OID names section of the configuration file – the elements we inserted at the top of the file. But the program does read the default configuration file (/etc/ssl/openssl.conf on my system) which contains (surprise) a default of sha1 for the digest algorithm. The rest of the tsa_config1 section below (where signer_digest and digest options are specified) is not processed. You can verify this by temporarily updating the configuration file with “signer_digest = sha999”, an invalid digest value, and an openssl ts -query request will run with no errors.
If you want to use a stronger digest algorithm, specify it on the command line (sha384 requested here):
$ openssl ts -query -config ../rootca.conf -data /etc/hosts -out request.tsr -sha384
Here, note that whatever digest is requested, must be a recognized openssl digest. If it is not, the program will throw an error and not generate a valid request. Almost all digest algorithms are supported in the openssl ts commands. The only valid digest values that do not seem to work for the openssl ts -query sub-command are:
md5-sha1
MD5-SHA1
RSA-SHA512/224 and /256

(and for earlier versions of OpenSSL)

GOST R 34.11-2012  Note however GOST R 34 11-2012 \(256 bit\) resolves to streebog256 \(accepted\).
GOST R 34-11-2012  Note however GOST R 34-11-2012 \(512 bit\) resolves to streebog512 \(accepted\).
Be aware that even though a digest may be accepted by openssl, it may be too insecure to use in production operation (e.g. sha1, md5). You should limit the value list in of the configuration file digests option to those you know provide acceptable security.
Generating a Reply
We can now process a reply to the the request. Note that the openssl ts -reply sub-command does require a configuration file, including the all the tsa sections. In particular, it uses the tsa_policy1(2,3) options we added at the top of the file.
Here (and everywhere you utilize the services of the tsa.crt certificate), you must enter the password for the tsa certificate private key.
$ openssl ts -reply -config ../rootca.conf -queryfile request.tsq -out response.tsr
Using configuration from ../rootca.conf
Enter PEM pass phrase:
Response has been generated.
The response can be viewed with:
$ openssl ts -reply -config ../rootca.conf -in response.tsr -text
A typical response looks like this:
Status info:
Status: Granted.
Status description: unspecified
Failure info: unspecified

TST info:
Version: 1
Policy OID: 1.2.3.4.6
Hash Algorithm: sha384
Message data:
    0000 - 4c c0 7d e6 dc 96 ae a1-e1 15 bf fe 8d ce 8c e4   L.}.............
    0010 - 44 ef 45 f1 e8 2c 60 7e-45 bd e3 f9 d1 2e aa 76   D.E..,`~E......v
    0020 - a8 37 d0 c6 18 5c 4e 0a-e8 25 c2 b9 b7 20 50 b1   .7...\N..%... P.
Serial number: 0xDC
Time stamp: Nov 12 01:13:16 2018 GMT
Accuracy: 0x01 seconds, 0x01F4 millis, 0x64 micros
Ordering: yes
Nonce: 0x767915B881615DF7
TSA: DirName:/C=US/O=Example Inc./OU=Engineering/CN=Example Inc. TSA Responder
Extensions:
Further, whatever digest algorithm was requested by the openssl ts -query, must be in the list of values in the configuration file digests option. If you remove the requested digest (sha384 in this case) from this list, the command will generate a non-fatal error and will generate a failure reply.
We have now generated a reply, but we did not require the response to use the root-ca.crt or tsa.crt certificate and certificate chain from the command line options. It turns out that openssl will do that anyway even if the -cert option was not added to the openssl ts -query command. It reads the configuration file signer_cert option value and the certs option value and reads both the certificate and the chain to validate the reply. If either cannot be found, the program will not generate a reply and will throw one or more errors.
You can request options on the command line that do not make sense, and the command will try to use those options – failing in a similar way.
$ openssl ts -reply -config ../rootca.conf \
	-queryfile request.tsq -out response.tsr \
	-signer tsa.crt -inkey private/root-ca.key
Here we have requested the correct certificate (tsa.crt), but the wrong key (root-ca.key). The command throws errors, and generates a failure reply:
Status info:
Status: Rejected.
Status description: Error during signature generation.
Failure info: unspecified

TST info:
Not included.
Verification
Openssl can also verify the received timestamp ensuring that the data file or data digest the query was based on still applies to the current version of the file.
$ openssl ts -verify -queryfile request.tsq -in response.tsr -CAfile root-ca.pem -untrusted tsa.pem
Verification: OK
The OK response ensures that the orignal signed timestamp is correctly authorized by the root and tsa certificates (in PEM format).
To verify that the file has not been further tampered with, include the same -data option as in the original query:
$ openssl ts -verify -data /etc/hosts -in response.tsr -CAfile root-ca.pem -untrusted tsa.pem
Verification: OK
You can verify this result by slightly modifying the /etc/hosts file contents and rerunning the command:
$ openssl ts -verify -data /etc/hosts -in response.tsr -CAfile root-ca.pem -untrusted tsa.pem
Verification: FAILED
34366903352:error:2FFFF067:time stamp routines:CRYPTO_internal:message imprint mismatch:/usr/src/crypto/libressl/crypto/ts/ts_rsp_verify.c:676:
It’s worth noting here that openssl ts -reply sub-command only verifies the file content, not the file metadata. The file metadata may have changed, however this does not affect the content which is what the timestamp processes work on.
In all the openssl ts sub-commands, it is not even necessary to specify the file. You can supply a previously generated hash of the file with the -digest command line option (not to be confused with the command line message digest algorithms discussed above such as -sha256, -whirlpool, etc.)
Take the hash of the file in question first:
$ sha256 /etc/hosts
SHA256 (/etc/hosts) = d97e78e0e822e0d6734878dc3fb0ef56d09f2b21fc88b69fe8456ad6bd421868
Process an openssl ts -query using the hash with the -digest command line option:
$ openssl ts -query -config ../rootca.conf \
  -digest d97e78e0e822e0d6734878dc3fb0ef56d09f2b21fc88b69fe8456ad6bd421868 \
  -out request.tsq -sha256
and an openssl ts -reply:
$ openssl ts -reply -config ../rootca.conf -queryfile request.tsq -out response.tsr
Now verify the original hash against the reply:
$ openssl ts -verify \
  -digest d97e78e0e822e0d6734878dc3fb0ef56d09f2b21fc88b69fe8456ad6bd421868 \
  -in response.tsr -CAfile root-ca.pem -untrusted tsa.pem
Verification: OK
Note if you specify a message digest algorithm on the command line in the openssl ts -query, it must be the same hash algorithm that processed the value for the -digest option, otherwise an error occurs. Here we ask for -sha512 on the command line, but pass a sha256 hash with the -digest command line option:
$ openssl ts -query -config ../rootca.conf \
  -digest d97e78e0e822e0d6734878dc3fb0ef56d09f2b21fc88b69fe8456ad6bd421868 \
  -out request.tsq -sha512
Using configuration from ../rootca.conf
bad digest, 64 bytes must be specified
could not create query
Adding Additional Precision
It is sometimes necessary to have additional precision added to a timestamp. The configuration file option is “clock_precision_digits” and is added to section tsa_config1:
clock_precision_digits = 6 # number of digits for sub-second accuracy.
Rerunning the query and reply return a timestamp with the required precision.
Figures 1 and 2 show a portion of the reply with the timestamp token specified by RFC 3161. The time is circled in red in both figures.
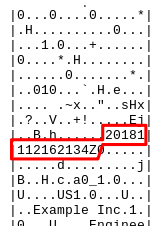
Figure 1: Partial hex dump of response showing simple timestamp.
You can see that six digits of additional precision are added after the ‘.’ in Figure 2.
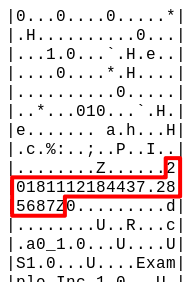
Figure 2: Partial hex dump showing timestamp with 6 digits precision.
The actual encoding specification in RFC 3161 is:
GeneralizedTime values MUST include seconds.  However, when there is
no need to have a precision better than the second, then
GeneralizedTime with a precision limited to one second SHOULD be used
(as in [RFC 2459]).

The syntax is: YYYYMMDDhhmmss[.s...]Z
   Example: 19990609001326.34352Z

X.690 | ISO/IEC 8825-1 provides the following restrictions for a
DER-encoding.

The encoding MUST terminate with a "Z" (which means "Zulu" time). The
decimal point element, if present, MUST be the point option ".". The
fractional-seconds elements, if present, MUST omit all trailing 0's;
if the elements correspond to 0, they MUST be wholly omitted, and the
decimal point element also MUST be omitted.
Conclusion
There are more options to be explored with the openssl ts commands, but these will get you started. You may also be able to use a simple transport such as tsget(1). Check your openssl distribtion to see if that command is avilable.
Final Configuration for rootca.conf:
#
# rootca.conf
#
# See Ristic OpenSSL Cookbook URL above.

oid_section                     = new_oids

[ new_oids ]
tsa_policy1                     = 1.2.3.4.1
tsa_policy2                     = 1.2.3.4.5.6
tsa_policy3                     = 1.2.3.4.5.7

######  First Part ########

[default]
name                    = root-ca
domain_suffix           = example.com
aia_url                 = http://$name.$domain_suffix/$name.crt
crl_url                 = http://$name.$domain_suffix/$name.crl
ocsp_url                = http://ocsp.$name.$domain_suffix:9080
default_ca              = ca_default
name_opt                = utf8,esc_ctrl,multiline,lname,align

[ca_dn]
countryName             = "US"
organizationName        = "Example Inc."
commonName              = "Root CA"

###### Second Part #######

[ca_default]
home                    = .
database                = $home/db/index
serial                  = $home/db/serial
crlnumber               = $home/db/crlnumber
certificate             = $home/$name.crt
private_key             = $home/private/$name.key
RANDFILE                = $home/private/random
new_certs_dir           = $home/certs
unique_subject          = no
copy_extensions         = none
default_days            = 3650
default_crl_days        = 30
default_md              = sha256
policy                  = policy_c_o_match
name                    = foo@example.com


[policy_c_o_match]
countryName             = match
stateOrProvinceName     = optional
organizationName        = match
organizationalUnitName  = optional
commonName              = supplied
emailAddress            = optional


##### Third Part #######

[req]
default_bits            = 4096
encrypt_key             = yes
default_md              = sha256
utf8                    = yes
string_mask             = utf8only
prompt                  = no
distinguished_name      = ca_dn
req_extensions          = ca_ext


[ca_ext]
basicConstraints        = critical,CA:true
keyUsage                = critical,keyCertSign,cRLSign
subjectKeyIdentifier    = hash


####### Fourth Part - Extensions  ########
#
# Value           Meaning  - see x509v3.cnf(5)
# --------        ------------------------------
# serverAuth      SSL/TLS web server authentication
# clientAuth      SSL/TLS web client authentication
# codeSigning     code signing
# emailProtection email protection (S/MIME)
# timeStamping    trusted doc hash timestamping
# OCSPSigning     OCSP Signing
# ipsecIKE        IPsec internet key exchange
# msCodeInd       Microsoft individual code signing (authenticode)
# msCodeCom       Microsoft commercial code signing (authenticode)
# msCTLSign       Microsoft trust list signing
# msEFS           Microsoft encrypted file system (EFS)


[sub_ca_ext]
authorityInfoAccess     = @issuer_info
authorityKeyIdentifier  = keyid:always
basicConstraints        = critical,CA:true,pathlen:0
crlDistributionPoints   = @crl_info
keyUsage                = critical,keyCertSign,cRLSign
extendedKeyUsage        = clientAuth,serverAuth
nameConstraints         = @name_constraints
subjectKeyIdentifier    = hash


[crl_info]
URI.0                   = $crl_url

[issuer_info]
caIssuers;URI.0         = $aia_url
OCSP;URI.0              = $ocsp_url

[name_constraints]
permitted;DNS.0=example.com
permitted;DNS.1=example.org
excluded;IP.0=0.0.0.0/0.0.0.0
excluded;IP.1=0:0:0:0:0:0:0:0/0:0:0:0:0:0:0:0


#######  Fifth Part (OCSP – not used) ==========


[ocsp_ext]
authorityKeyIdentifier  = keyid:always
basicConstraints        = critical,CA:false
extendedKeyUsage        = OCSPSigning
keyUsage                = critical,digitalSignature
subjectKeyIdentifier    = hash


###########  TSA extension   ##############
#
#
#

[ tsa ]

default_tsa             = tsa_config1

[ tsa_config1 ]
dir                     = .                     # TSA root directory, same as root-ca
serial                  = $dir/tsa_serial       # current serial number (mandatory)
signer_cert             = $dir/tsa.crt     # signing certificate (optional)
certs                   = $dir/tsa-chain.pem # certification chain (optional)
signer_key              = $dir/private/tsa.key # tsa private key (optional)
default_policy          = tsa_policy1
signer_digest           = sha256                # digest to use for signing (optional)
#other_policies         = tsa_policy2,tsa_policy3 # other policies (optional)
digests                 = sha256,sha384,sha512    # acceptable digests (mandatory)
accuracy                = secs:1,millisecs:500,microsecs:100 # accuracy optional
ordering                = yes                   # is ordering defined? (optional, default: no)
tsa_name                = yes                   # must tsa name be included in reply? (opt., default: no)
ess_cert_id_chain       = yes                   # must ess cert id change be incl? (opt., default: no)
ess_cert_id_alg         = sha256                # alg to compute cert. id (optional, default: sha1)

# The tsa_ext extension is
# used to create the tsa cert tsa.crt

[ tsa_ext ]

authorityKeyIdentifier  = keyid:always
basicConstraints        = critical,CA:false
extendedKeyUsage        = critical,timeStamping
keyUsage                = critical,nonRepudiation
subjectKeyIdentifier    = hash